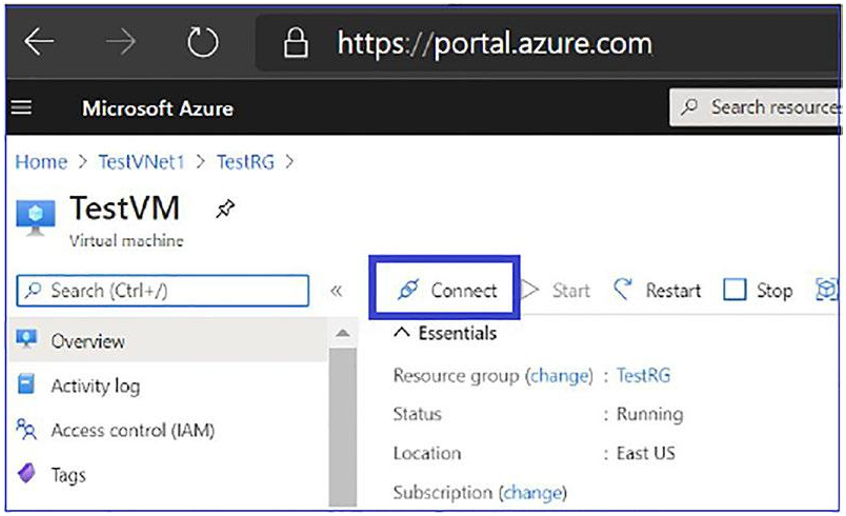
\ 1.\ Log in to the Azure portal (https://portal.azure.com), navigate to the virtual machine that you want to connect to, and select Connect. Select Bastion from the drop-down list. Figure 4-34 shows the Bastion option.
Figure 4-34. Connecting to Bastion
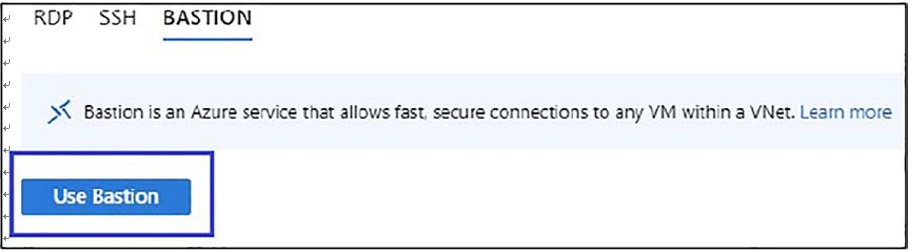
\ 2.\ After you select Bastion from the drop-down, a sidebar appears that has three tabs: RDP, SSH, and Bastion. Because Bastion was provisioned for the virtual network, the Bastion tab is active by default. Select Use Bastion. For more information, refer to Figure 4-35.
Figure 4-35. Usong Bastion
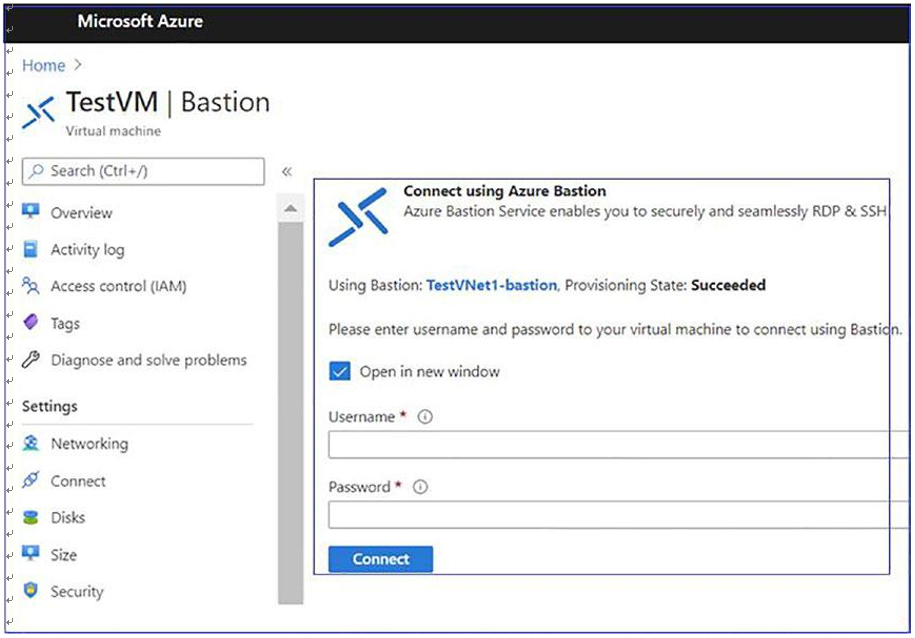
\ 3.\ On the “Connect using the Azure Bastion” page, enter the username and password for your virtual machine, and then click Connect. See Figure 4-36.
Figure 4-36. Connecting using Azure Bastion
\ 4.\ The RDP connection to this virtual machine via Bastion will open directly in the Azure portal (over HTML5) using port 443 and the Bastion service.
Monitor and Troubleshoot Network Connectivity
After learning about virtual desktop network connectivity and management, you as an admin must learn about different troubleshooting scenarios for using virtual desktop connectivity. There are different tools that can you use to troubleshoot the connectivity issues and diagnosis the problems.
Azure Virtual Desktop Monitoring
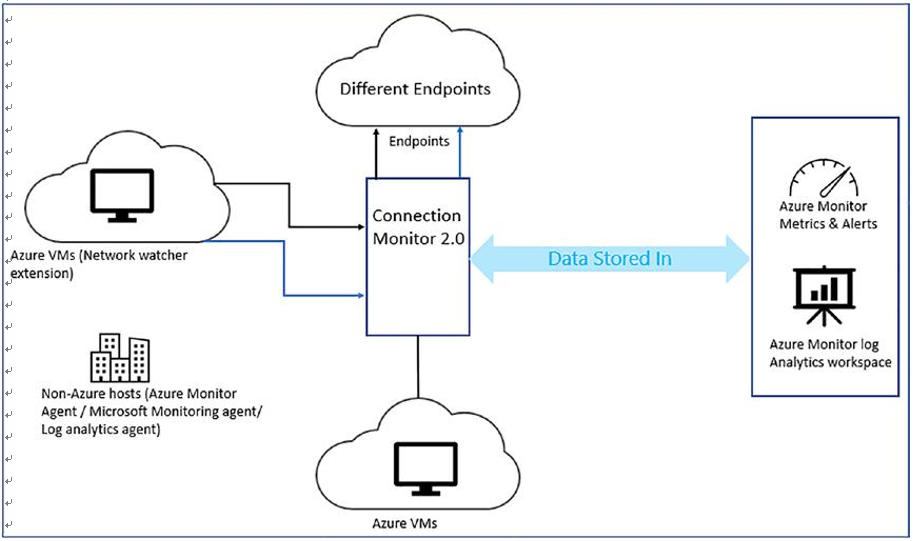
The Azure Network Watcher tool provides helps to monitor, diagnose, view metrics, and enable or disable logs for resources in an Azure virtual network. The Network Watcher is intended to monitor and repair the network health of infrastructure-as-a-service (IaaS) products that include virtual machines, virtual networks, application gateways, and load balancers. Figure 4-37 gives you the general idea about the Azure Network Watcher tool.
Here are some recommendations for identity design:
•\ Use Azure AD Connect to synchronize all identities to a single Azure AD tenant.
•\ Ensure Azure Virtual Desktop session hosts can communicate with Azure AD DS or AD DS.
•\ Use the least privilege principle to assign the minimum permissions needed for authorized tasks.
•\ Segregate session host virtual machines into Active Directory organization units for each host pool to manage policies and orphaned objects more easily.
•\ Use a solution like Local Administrator Password Solution (LAPS) to rotate local administrator passwords on Azure Virtual Desktop session hosts frequently.
•\ Create conditional access policies for Azure Virtual Desktop. Such policies can enforce multifactor authentication based on conditions such as risky sign-ins to increase an organization’s security posture.
•\ Configure AD FS to enable single sign-on for users on the corporate network. Different Directory Options
There are three common ways to use Active Directory–based services in Azure for identity and authentication. This choice of identity solutions is dependent on your organization’s needs. For example, if you have cloud-based application and cloud-only users accessing the application, then Azure Active Directory is a suitable solution, but in case you want to assign a policy on cloud-only devices and you don’t have on-premises AD DS, then you can select Azure Active Directory domain services (AAD DS). Another use case is if you already have traditional on-premises AD DS and you want to use same domain user to authenticate cloud-based application/devices, then you can sync on-premises AD DS with Azure AD and use the on-premises identity for cloud as well.
Although the three Active Directory–based identity solutions share a common name and technology, they are designed to provide different customer needs.
The following are the three different identity solutions Microsoft provides:
•\ Active Directory Domain Services (AD DS): This is a traditional Lightweight Directory Access Protocol (LDAP) server that provides key features such as identity and authentication, computer object management, Group Policy, and trusts. AD DS is a service available in Windows Server, and many organizations are already using it as the central component in their on-premises datacenter. Azure Virtual Desktop supports an on-premises ADDS service, and you can either directly sync on-premises AD DS with Azure AD or extend it in Azure and then sync it with Azure AD to avoid authentication and sync traffic going over VPN/ER. Extended AD DS server in Azure can be used for domain joins and AVD desktop authentication as well.
•\ Azure Active Directory (Azure AD): Azure AD is a cloud-based identity and mobile device management (MDM) provider that gives the ability to create user account and authenticate services for resources such as Microsoft 365, the Azure portal, and software-as-a-service applications. On-premises AD DS can be synchronized with Azure AD to provide a single-user identity across the organization. Azure AD is required for authentication, but it needs to be synced with on-premises AD DS or Azure AD DS. •\ Azure Active Directory Domain Services (Azure AD DS): Azure AD DS consists of managed domain services the same as traditional AD DS with features such as domain joins, Group Policy, LDAP, and Kerberos/NTLM authentication with a minimal amount of administrative overhead (but limited admin permission; refer to Azure AD DS). Azure AD DS integrates with Azure AD, which itself can synchronize with an on-premises AD DS. This ability extends central identity use cases. Azure AD DS is one of the best options supported by Azure Virtual Desktop if you don’t have any directory solution in place or if you want to set up isolated AVD POC.
What Is the Best Identity Solution for Azure Virtual Desktop?
Azure Virtual Desktop uses the AD DS domain join feature for all session hosts, and the user must enter domain credentials to log in to Azure Virtual Desktop. To avoid a dependency on site-to-site VPN/ER for authentication traffic to on-premises AD DS, on-premises AD DS can be extended to the Azure hub subscription by creating a domain controller VM in Azure. Most organizations do not want to store password hashes in the cloud AD and prefer to go with pass-through authentication with on-premises AD. This approach increases traffic and dependency on the site-to-site VPN tunnel by sending all authentication/DNS traffic to the on-prem AD. Extending the AD domain controller to Azure is the recommended option if all application/services are using on-premises AD for authentication or else the Azure AD connect VM can be placed on-premises to sync on-premises AD users directly to Azure AD if you have fewer users using cloud services.
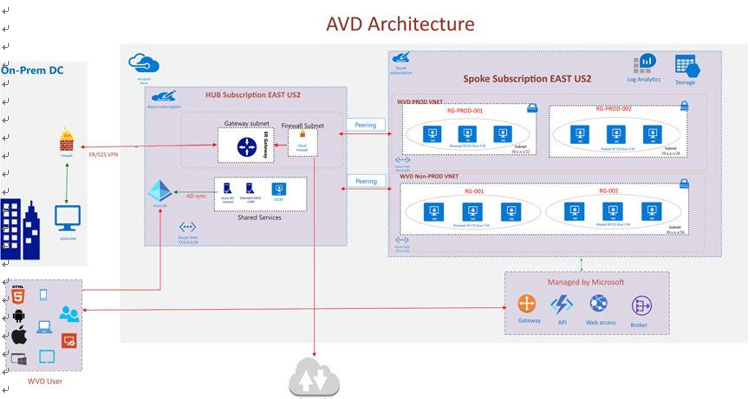
Figure 3-5 shows a reference architecture for on-premises AD sync with Azure AD for Azure Virtual Desktop auth.
This diagram shows a typical architectural setup for Azure AD sync.
•\ All domain controller replication traffic flows over a site-to-site VPN/ER.
•\ A cloud-extended domain controller can be used for authentication instead of sending traffic on-premises when using pass-through authentication.
•\ By default, the Azure AD Connect sync server configures password hash synchronization between the on-premises domain and Azure AD, and the Azure AD service assumes that users authenticate by providing the same password that they use on-premises. The security policy of organization may prohibit synchronizing password hashes to the cloud. In this case, your organization should consider pass- through authentication.
The architecture has the following components:
•\ Azure AD tenant: An instance of Azure AD created by organization. It acts as a directory service for cloud applications by storing objects copied from the on-premises Active Directory and provides identity services.
•\ On-premises AD DS server: An on-premises directory and identity service. The AD DS directory can be synchronized with Azure AD to enable it to authenticate on-premises users.
•\ Azure AD Connect sync server: A computer that runs the Azure AD Connect sync service. This service synchronizes information held in the on-premises Active Directory to Azure AD. For example, if you provision or deprovision groups and users on-premises, these changes propagate to Azure AD.
•\ User authentication: By default, the Azure AD Connect sync server configures password hash synchronization between the on-premises domain and Azure AD, and the Azure AD service assumes that users authenticate by providing the same password that they use on-premises. For many organizations, this is appropriate,
but if your organization’s security policy prohibits synchronizing password hashes to the cloud, then you should consider pass-through authentication. Alternatively, you can configure Azure AD to use Active Directory Federation Services (AD FS) or a third-party federation provider to implement authentication and SSO rather than by using the password information held in the cloud.
VNet and on-premises connectivity are important prerequisites for Azure Virtual Desktop. It is important to set up VNet correctly with the required subnet, DNS settings, and peering with a hub virtual network for on-premises connectivity (or hub shared service connectivity) so that users can use their domain credentials to log in to AVD and access their on-premises applications/services.
Follow these steps to create a VNet instance for AVD:
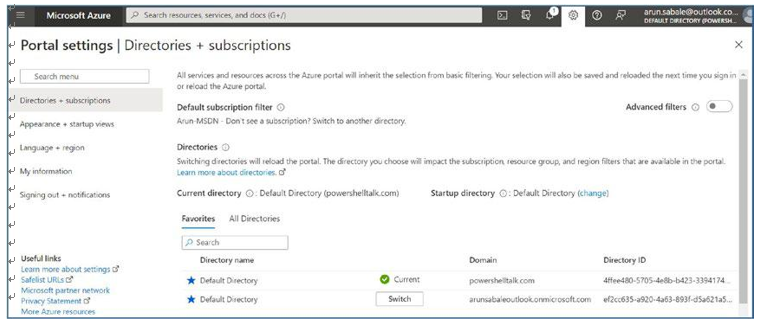
\ 1.\ Log in to the Azure portal and select the correct directory and subscription where you want to create the AVD host pool and desktops. Make sure you have correct permissions (contributor or owner) to create network resources. See Figure 4-2.
Figure 4-2. Azure subscription selection
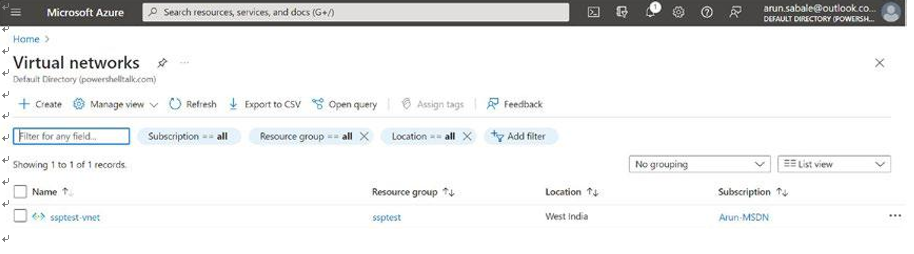
\ 2.\ Search for virtual network in the top search bar. See Figure 4-3.
Figure 4-3. Azure virtual network search
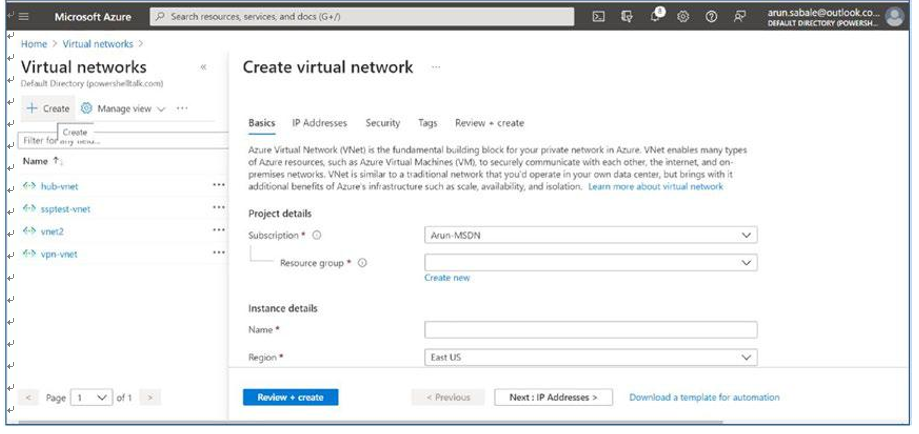
\ 3.\ Click Create to create a new virtual network. See Figure 4-4.
Figure 4-4. Azure virtual network creation
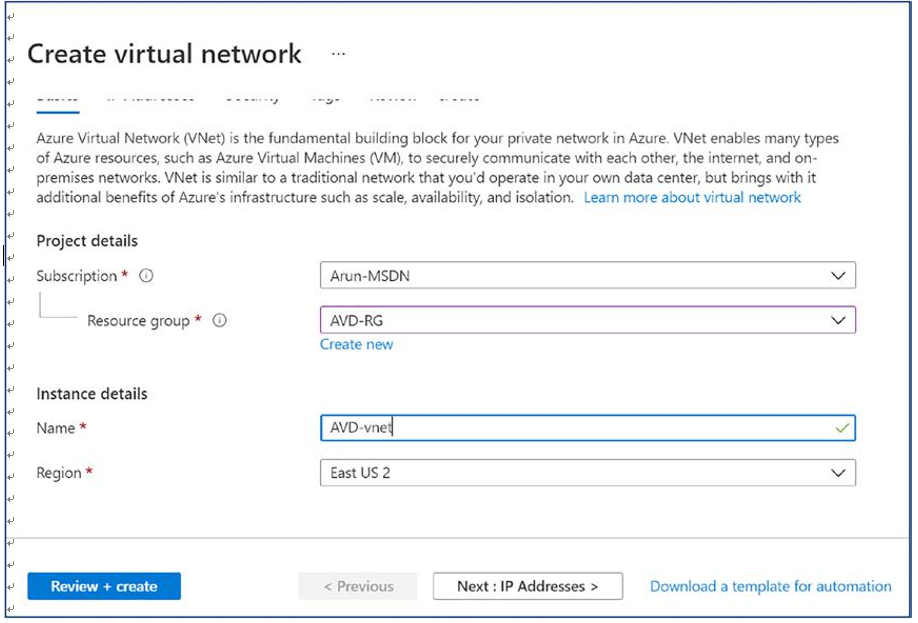
\ 4.\ Select the correct subscription and resource group names from the drop-down where you want to create the AVD desktops. If the resource group does not exist, then you can create a new resource group by clicking the Create New option. See Figure 4-5.
Figure 4-5. Azure virtual network creation page
\ 5.\ Additionally, provide the virtual network name as per your organization’s naming standard and select the correct region (the same as AVD desktops). Click the Next button once, and enter all the information. See Figure 4-6.
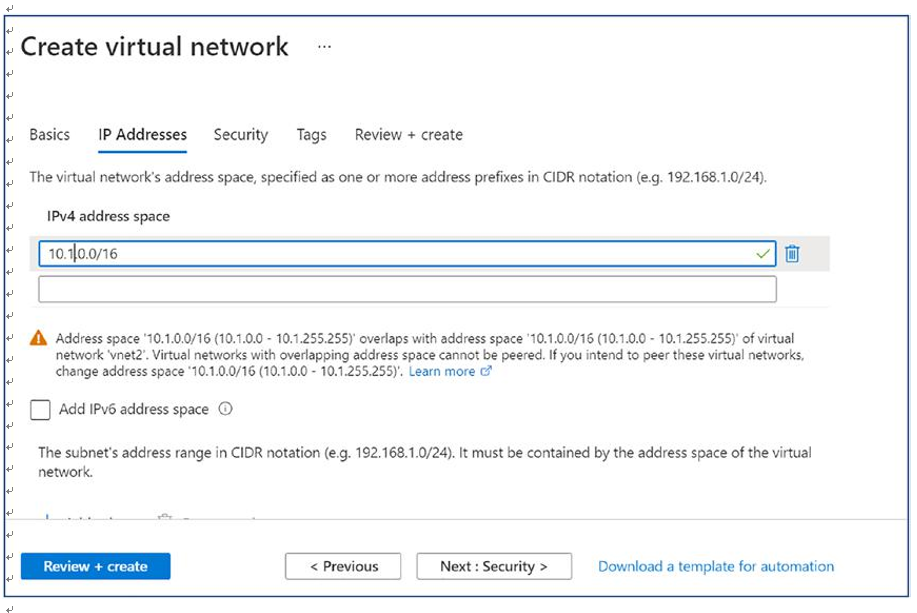
\ 6.\ Provide the IP address space/range for VNet on the IP Addresses tab. You must coordinate with the network team to get the correct IP address range for AVD VNet that does not conflict with an existing VNet or on-premises IP address range. See Figure 4-7.
Figure 4-7. Azure virtual network creation, IP Addresses tab
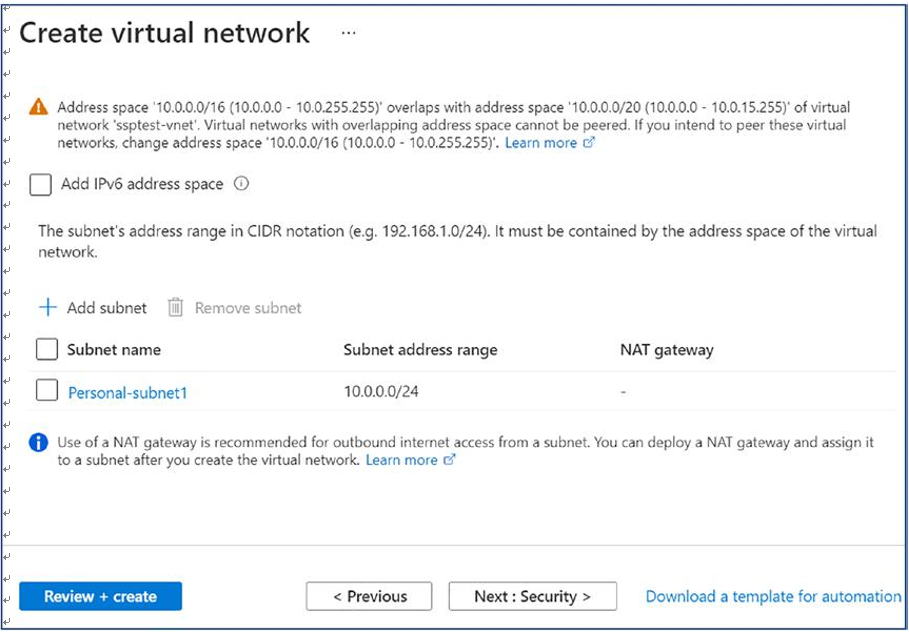
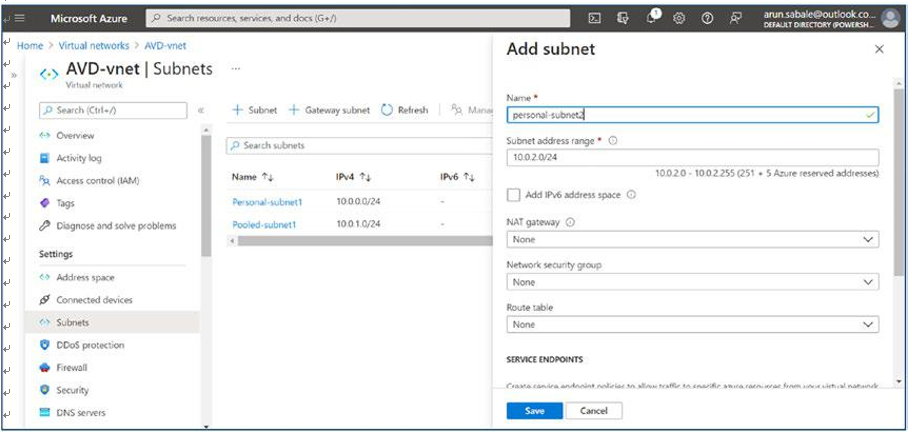
\ 7.\ Additionally, create an appropriate subnet on the same IP Addresses tab. You can click the “Add subnet” option to add additional subnets. You must consider the number of session hosts/VMs you are planning to create under each subnet plus some buffer IP addresses for future use and create the subnet accordingly. Create the subnet, remembering that each host pool needs to be placed in different subnets if they belong to different business units and don’t want to share any user data. See Figure 4-8.
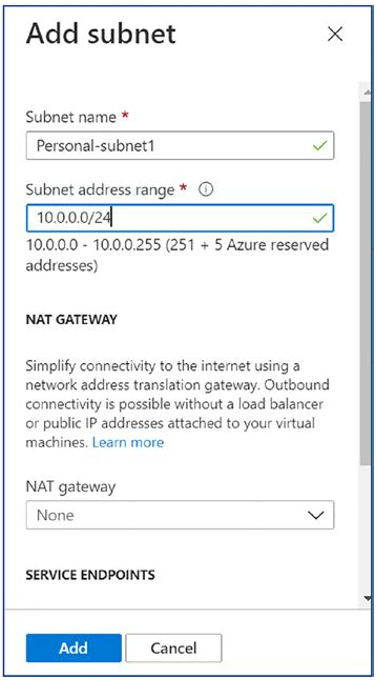
\ 8.\ You will get a subnet pop-up to enter additional subnet information like the name and IP address range. Make sure you are entering the subnet name as per your organization’s naming standards. Click the Add button to add the subnet. See Figure 4-9.
Figure 4-9. Azure virtual network creation, adding a subnet detail
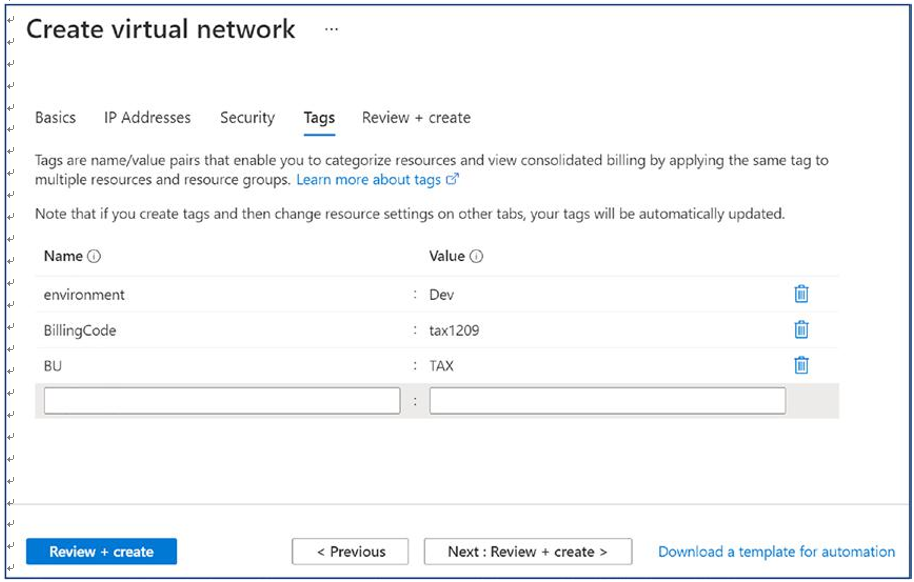
\ 9.\ Once you have entered all the IP address information, then click Next to go to the Security tab and verify whether you want to change anything as per your organization standards, or click Next to go to Tags. Make sure you are adding tags as per your organization’s standards and click Next. See Figure 4-10.
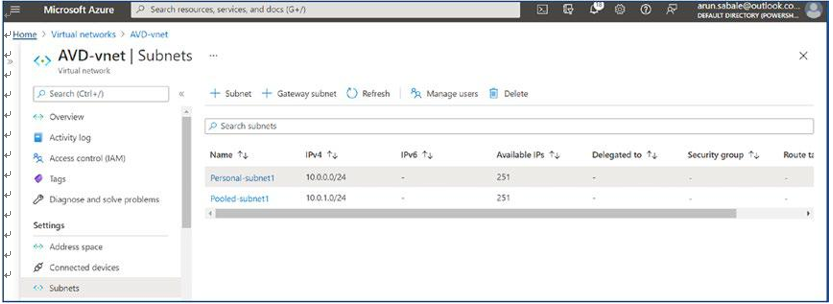
\ 13.\ If you still want to add subnets, then you can go to the Subnet option in the left pane and click to add a subnet. See Figure 4-14.
Figure 4-14. AVD virtual network, adding a subnet
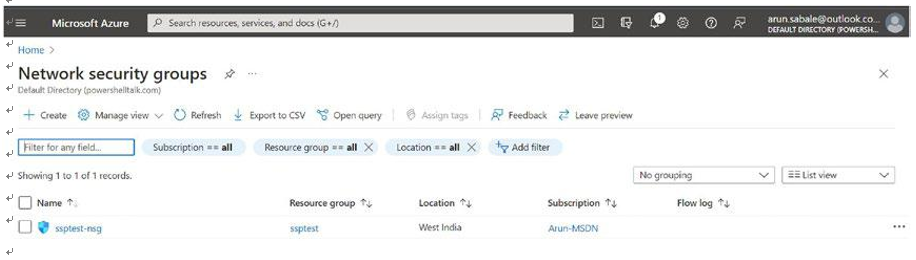
\ 14.\ Once the subnet and VNet are ready, then the next step is to create a network security group (NSG), peering to a hub virtual network, and DNS settings. Create the NSG and click the Create option to create a new network security group. See Figure 4-15.
Figure 4-15. AVD virtual network, creating a NSG
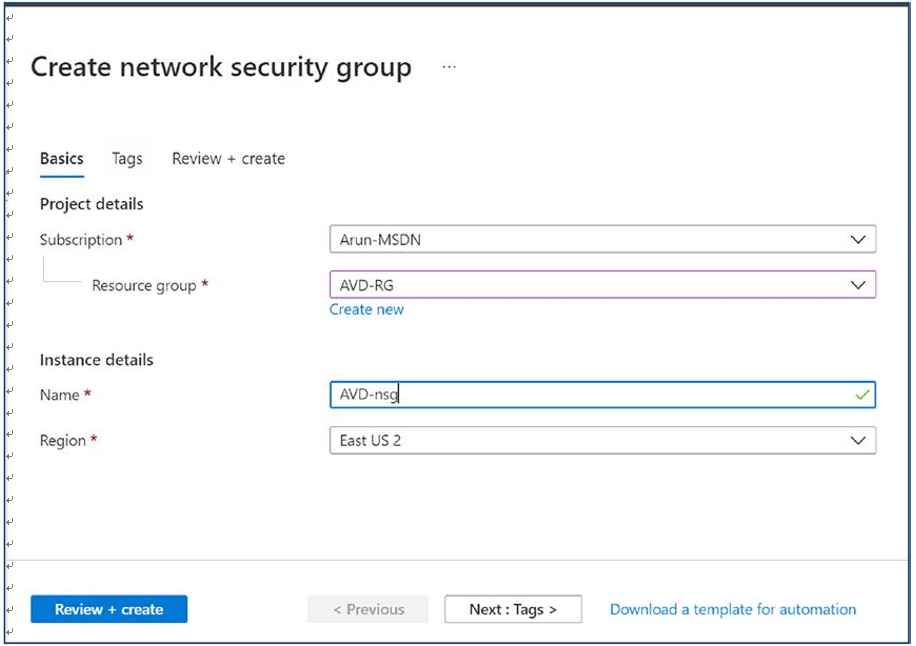
\ 15.\ Select the correct subscription and resource group for the network security group (the same as AVD VNet). Add the NSG name and select the correct region the same way as you did for the VNet and AVD desktops. See Figure 4-16.
Figure 4-16. AVD NSG creation
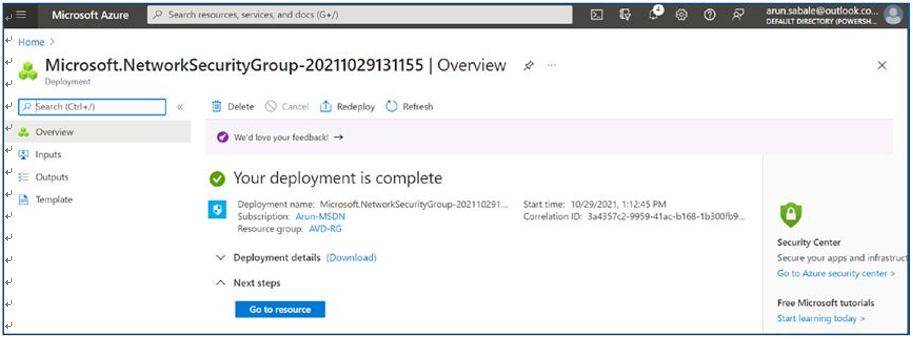
\ 16.\ You will see the deployment status on the same page. Wait for the deployment to complete and then click “Go to resource.” See Figure 4-17.
Figure 4-17. A AVD NSG creation, deployment status
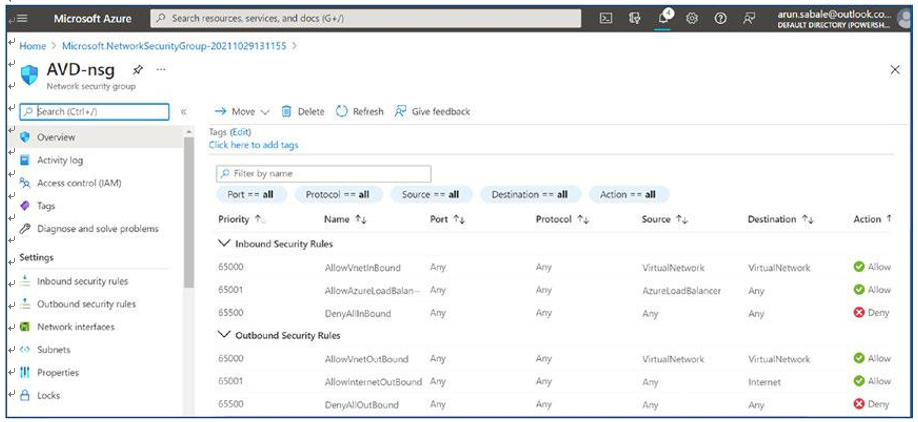
\ 17.\ The NSG default rules will be visible on the Overview page. See Figure 4-18.
Figure 4-18. AVD NSG, Overview page
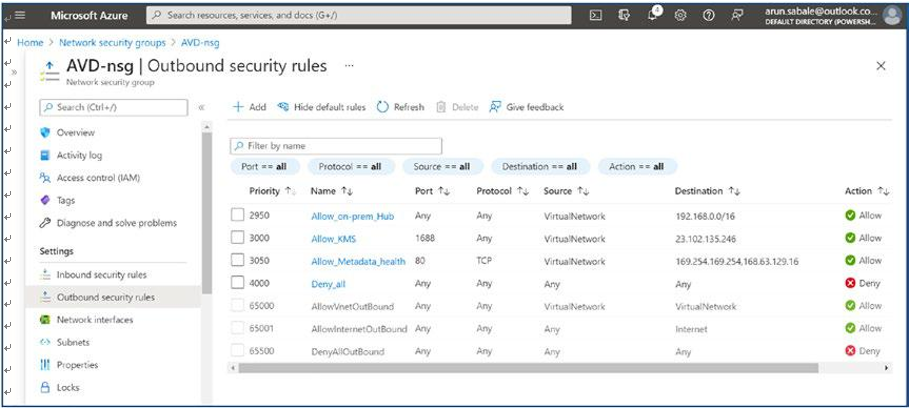
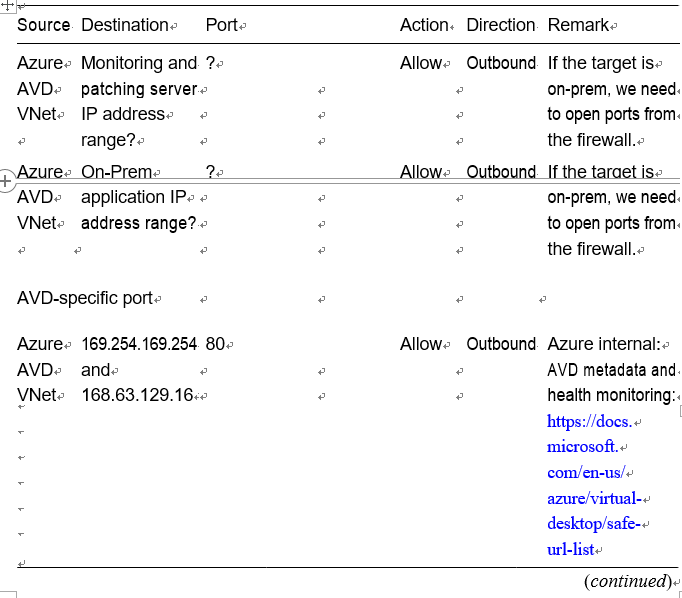
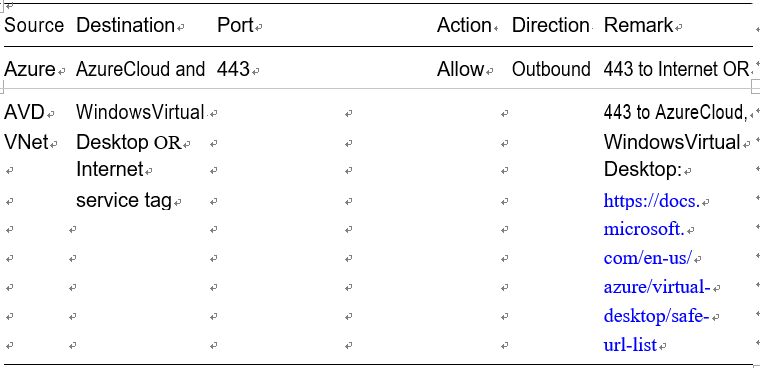
\ 18.\ Make sure to add the AVD-specific IP/port in the outbound rules. The following are the recommended/required IP addresses/ ports for AVD. AVD does not require any inbound connection but definitely needs KMS, metadata, health monitoring IP addresses/ ports, and a few Azure service tags in case you don’t want Internet access on the VM. Refer to Table 4-1 for all AVD-specific port and IP details. See Figure 4-19.
\ 19.\ Once an NSG is updated with the correct rules, then you have to attach it to subnets so that the rules will take effect. Go back to the AVD virtual network you created at the start and go to the subnet option from the left pane. Now click the subnet name and attach the NSG from the right-side pane. See Figure 4-20.
Figure 4-20. AVD NSG assignment
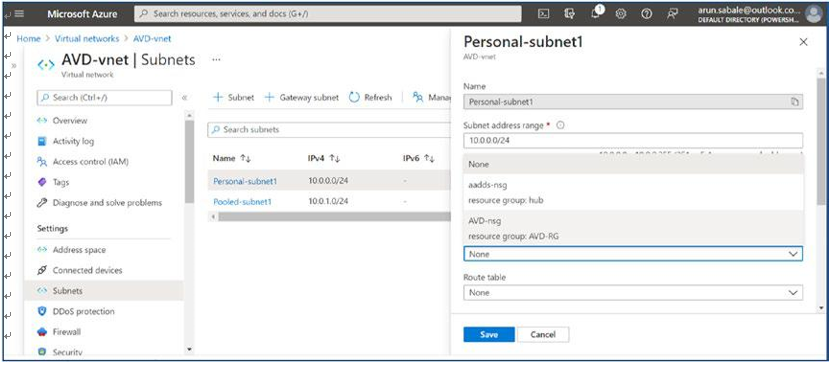
\ 20.\ Select the network security group from the drop-down in the subnet pop-up. See Figure 4-21.
Figure 4-21. AVD NSG assignment on subnet
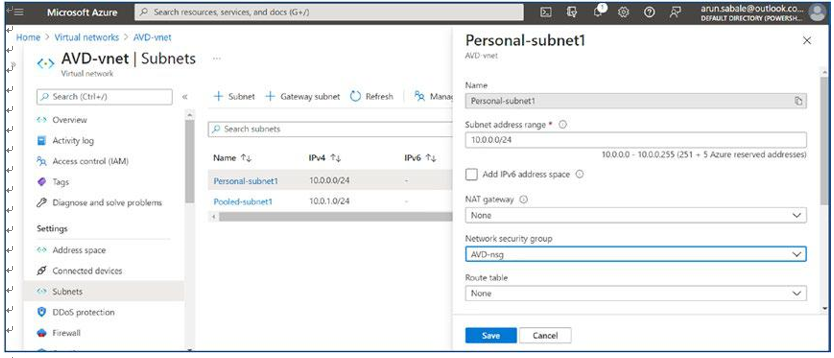
\ 21.\ Select the correct NSG name and click the Save button. See Figure 4-22.
Figure 4-22. AVD NSG assignment page
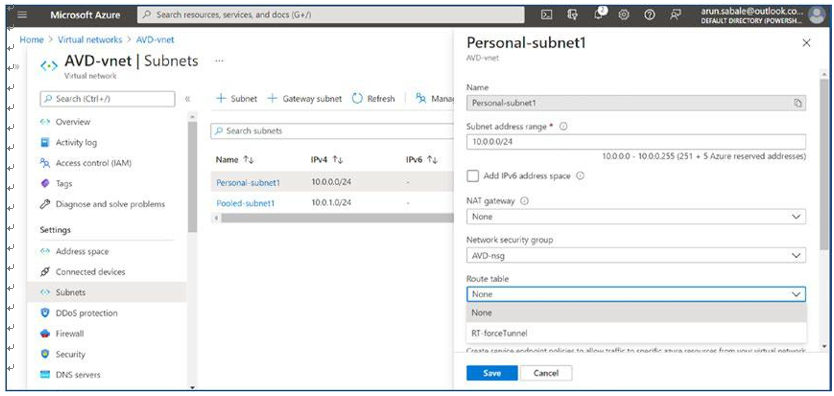
\ 22.\ You can attach a route table to force-tunnel all traffic to the Azure firewall or third-party firewall in the cloud or on-premises firewall. Select the routing table from the drop-down to attach it to the subnet. See Figure 4-23.
Figure 4-23. AVD NSG assignment page- route table
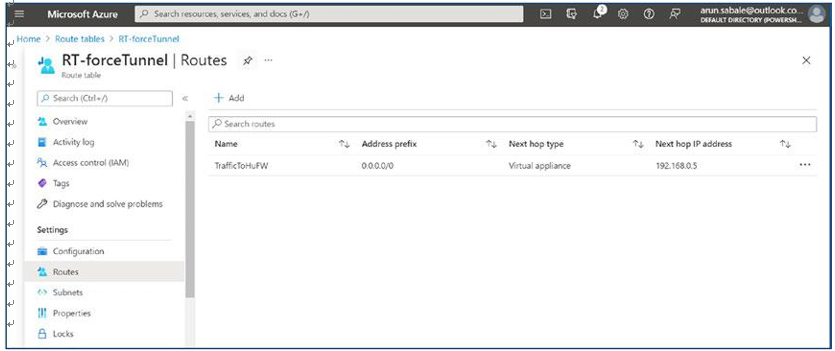
\ 23.\ Make sure you have the correct port/IP address open on the firewall/NVA when you are force-tunneling all AVD traffic. Additionally, the routing table must have the correct route. Refer to the route table in Figure 4-24.
Figure 4-24. AVD routing table to force-tunnel traffic to the firewall
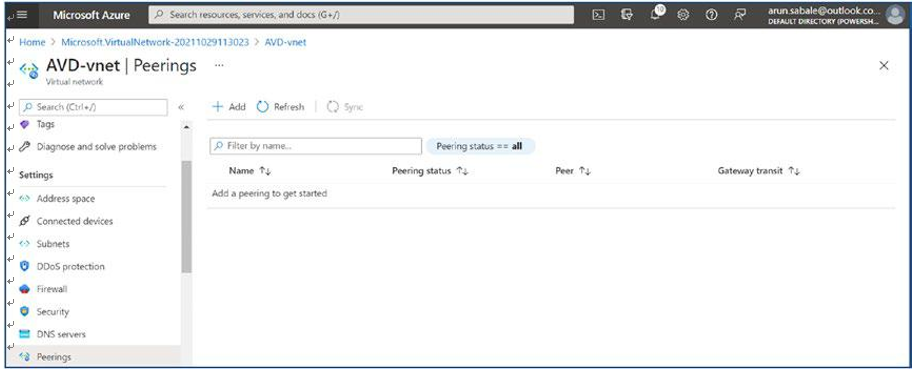
\ 24.\ Once you have updated the NSG and route table, then create peering with the hub VNet so all traffic to on-premises/the other VNet can go through the hub VNet. Go to the hub VNet, click Peering in the left pane, and then click the Add option in the right pane. See Figure 4-25.
Figure 4-25. AVD virtual network peering to hub virtual network
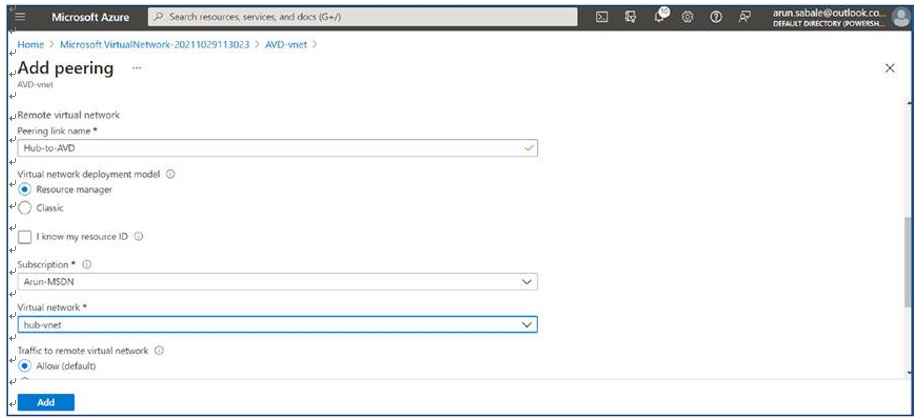
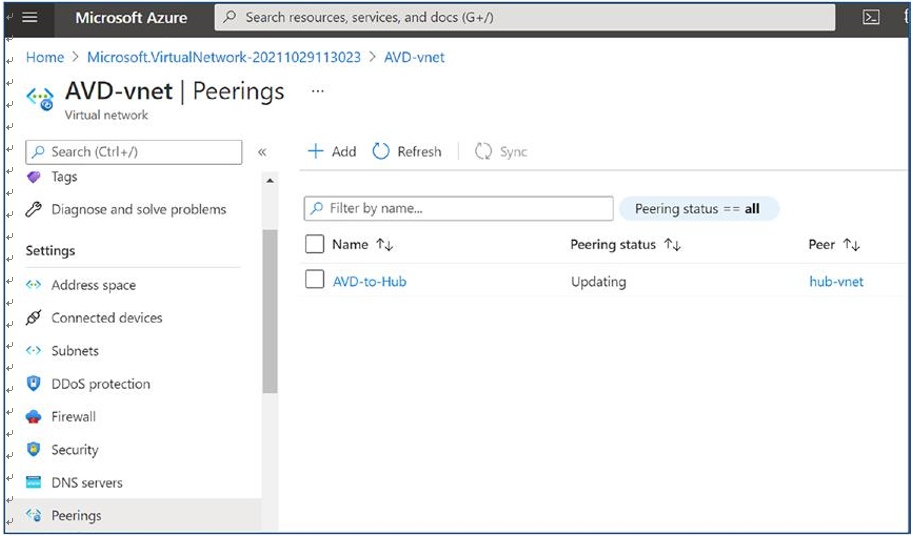
\ 25.\ Enter the names for peering from the hub to AVD and vice versa. Additionally, select the target virtual network in the drop-down to peer with. Most important, allow all traffic as well as gateway transit so that the gateway will be used for on-premises traffic. The “Gateway transit” option will be available when you have a gateway in the hub for a site-to-site VPN or ExpressRoute. Click the Add button once you select all the options on the peering page. See Figure 4-26.
\ 27.\ The next step is to update the DNS settings on AVD VNet. Go to AVD VNet and click the DNS Servers option in the left pane. See Figure 4-28.
Figure 4-28. AVD virtual network, DNS server setting
\ 28.\ Select the Custom option in the right pane and enter the DNS server’s IP address. Additionally, you must make sure the DNS port and IP address are open on all firewalls and NSGs so that the session host can reach the DNS server on port 53. Once the IP address is added, then click the Save button to save the configuration. See Figure 4-29.
Figure 4-29. AVD virtual network, custom DNS server setting
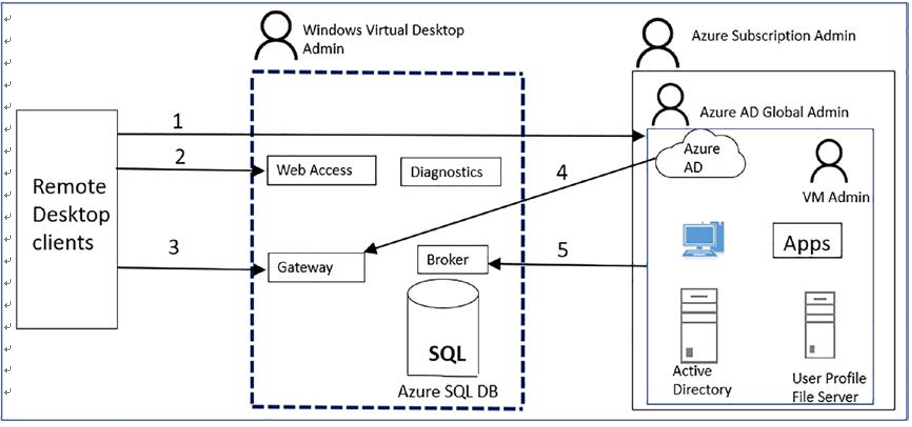
As an Azure Virtual Desktop admin, you must manage virtual desktops and their connectivity, so understanding virtual desktop network connectivity is important. Fundamentally, Azure Virtual Desktop utilizes Remote Desktop Protocol (RDP) to offer remote display and input capabilities over network connections. The connection data flow for Azure Virtual Desktop starts with a DNS lookup for the closest Azure datacenter. Figure 4-31 demonstrates the five-step connection process for Azure Virtual Desktop running in Azure.
\ 1.\ When authenticated in the Azure Active Directory, a token is returned to the Remote Desktop Services client.
\ 2.\ The gateway checks the token with the connection broker.
\ 3.\ The broker queries the Azure SQL database for resources assigned to the user.
\ 4.\ The gateway and the broker select the session host for the connected client.
\ 5.\ The session host creates a reverse connection to the client by using the Azure Virtual Desktop gateway. Figure 4-31 shows Azure Virtual Desktop connectivity.
Figure 4-31. Azure Virtual Desktop connectivity
When no inbound ports are opened, the gateway acts as an intelligent reverse proxy. The gateway manages all session connectivity, with nothing but pixels reaching the client. Azure Virtual Desktop hosts client sessions on the session hosts running on Azure. Microsoft manages portions of the services on the customer’s behalf and provides secure endpoints for connecting clients and session hosts.
Azure Virtual Desktop Network Connection
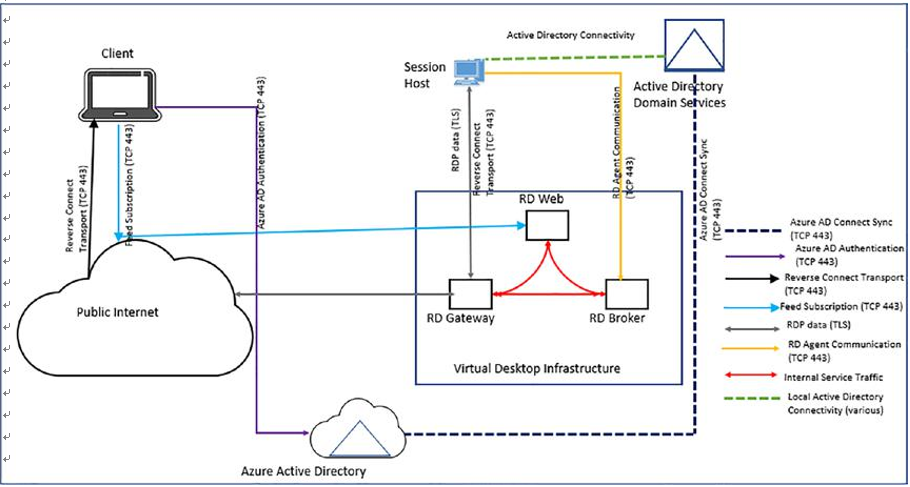
Azure Virtual Desktop hosts client sessions on the session hosts operating on Azure. Since Azure is a cloud-based service, Microsoft manages portions of the services on the customer’s behalf and offers secure endpoints for connecting clients and session hosts. Figure 4-32 shows a high-level summary of the network connections utilized by Azure Virtual Desktop.
•\ Session connectivity: Azure Virtual Desktop uses Remote Desktop Protocol to provide remote display and input capabilities over network connections.
•\ Reverse connect transport: Azure Virtual Desktop is utilizing a reverse connect transport for establishing the remote session and for carrying RDP traffic. Unlike the on-premises Remote Desktop Services deployments, reverse connect transport doesn’t use a TCP listener to receive incoming RDP connections. Instead, it is using outbound connectivity to the Azure Virtual Desktop infrastructure over the HTTPS connection.
•\ Session host communication channel: Upon startup of the Azure Virtual Desktop session host, the Remote Desktop Agent Loader service establishes the Azure Virtual Desktop broker’s persistent communication channel. This communication channel is layered on top of a secure Transport Layer Security (TLS) connection and serves as a bus for service message exchange between the session host and Azure Virtual Desktop infrastructure.